How to Remove Sliding Glass Door: The Complete DIY Guide
Sliding glass doors are fantastic for letting the outdoors in — they flood our living rooms with sunlight, offer quick backyard access, and often become the main thoroughfare for kids, pets, and backyard barbecues. But let’s be honest — nothing lasts forever. Maybe your door sticks every time you try to open it, the frame’s warped from years of wear and tear, or you’re ready to give your home a facelift with sleek new French doors. Whatever your reason, knowing how to remove sliding glass door panels and frames safely is an essential DIY skill that can save you a lot of money and stress. In this detailed guide, I’m going to walk you through the entire process step by step, break down what tools you’ll need, point out mistakes to avoid, and answer the most common questions homeowners have about taking out these big glass beasts.
Introduction
Most homeowners don’t think much about their sliding glass doors — until they break. Maybe the rollers don’t roll anymore, the track’s dented, or the weatherstripping’s seen better days. The good news? Removing a sliding glass door is totally doable for the average DIYer, as long as you know what you’re doing and you take a few safety precautions. Sure, it’s a bit intimidating the first time — after all, we’re talking about moving giant sheets of glass. But with some patience, the right tools, and maybe a helpful friend, you can get it done in an afternoon and be ready to install something better.
Why You Might Want to Remove a Sliding Glass Door

Before you start prying off trim and unscrewing panels, it’s worth understanding the common reasons people decide it’s time to say goodbye to their old slider. Knowing your “why” helps you plan the next steps, whether you’re installing a shiny new patio door, closing up the opening completely, or just trying to fix a damaged part of your house.
Upgrading to New Doors
One of the biggest reasons people research how to remove sliding glass door setups is because they want something better. Today’s modern doors are energy-efficient, more secure, and way smoother to open and close. Swapping that old rattly slider for new French doors, bi-folds, or a bigger sliding system can transform the look of your living room and boost your home’s value. Sometimes, it’s not just about looks — newer doors help keep your home warmer in winter and cooler in summer, which can cut down on energy bills too.
Repairing or Replacing Damaged Tracks
If you’ve ever tried to muscle a sticky sliding door open with your shoulder, you know how frustrating it can be. The culprit is usually worn-out rollers or a warped track. While you can sometimes replace the rollers without removing the entire door, more severe damage often means pulling the panels out completely. Some people find that by the time they price out repairs, it’s smarter to remove the old door altogether and start fresh.
Creating a New Entryway
Sometimes the project goes beyond just swapping one door for another. Maybe you’re planning to close off that opening to expand your kitchen or knock out the wall for a bigger patio door. Some homeowners even remove a sliding glass door to replace it with a huge picture window — letting in light but blocking drafts. Whatever your grand plan, it all starts with learning how to remove sliding glass door panels the right way.
Things to Consider Before You Start
Okay, before you bust out your toolbox and start unscrewing things, let’s hit pause. There are a few practical (and safety) checks you should think through to make sure your DIY mission doesn’t turn into a disaster halfway through.
Check for Permits
First things first — do you actually need permission to do this? In many places, you don’t need a permit just to remove a door and replace it with another of the same size. But if you’re making the opening bigger, reframing the wall, or doing anything structural, your local building code might say otherwise. A quick call to your local permit office can save you headaches (and possible fines) later.
Safety Precautions
This is glass, people — big, heavy glass. One wrong move and you could end up with shards all over the floor, or worse, in your hand. Always wear heavy-duty work gloves, sturdy shoes (no flip-flops!), and safety goggles. If your door is old and you suspect the glass isn’t tempered, handle it extra carefully — older doors sometimes have regular glass that can break into dangerous, jagged pieces. And please, keep kids and pets out of the work area until you’re done.
Understand the Door Type
Not all sliding glass doors are created equal. Some have simple lift-out panels, others are sealed with multiple screws, stops, and layers of caulking. Older aluminum doors can be surprisingly heavy and awkward, while modern vinyl doors might have extra insulation or special fasteners. Knowing exactly what you’re working with will help you remove it without accidentally damaging the frame or the surrounding wall.
Tools and Materials You’ll Need
Don’t wait until you’re halfway through the job to realize you’re missing a crucial tool. Here’s a checklist to get you ready for action.
Basic Tools
Most people tackling how to remove sliding glass door panels will need:
-
A Phillips and flathead screwdriver (or a drill with bits)
-
A sturdy pry bar
-
A sharp utility knife
-
Tape measure
-
Hammer
-
Possibly a putty knife for stubborn stops
Protective Gear
Safety first. Make sure you’ve got:
-
Heavy-duty work gloves
-
Safety goggles or glasses
-
Closed-toe shoes (preferably boots)
Optional Extras
For extra-large doors, suction cups used for moving glass panels can be a lifesaver — they help you grip the glass safely and avoid dropping it. And, of course, the best tool of all: a buddy. Some doors are just too big and awkward to handle alone.
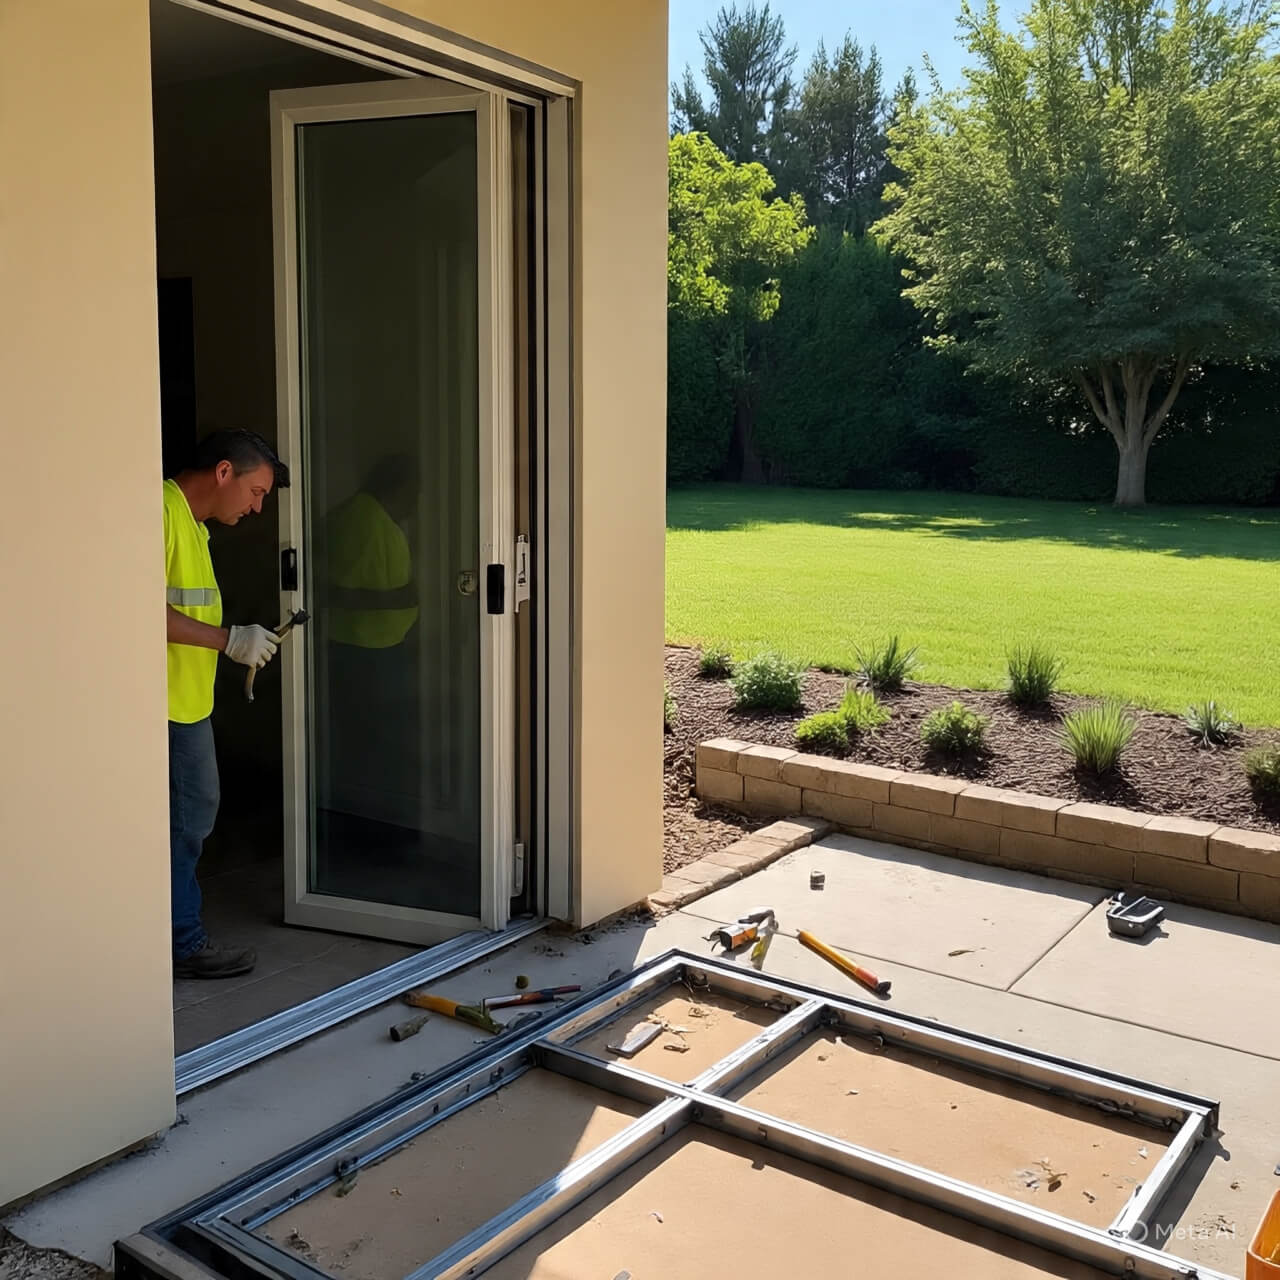
Step-by-Step Guide: How to Remove Sliding Glass Door

Alright — you’re ready. Let’s break down how to remove sliding glass door panels and frames piece by piece. Take your time and follow each step carefully.
Step 1: Clear the Area
First up, make space. Move furniture, curtains, and anything breakable far from the door. Put down a drop cloth or old blanket to protect your floor from scratches or stray screws.
Step 2: Remove the Screen Door
If your door has a sliding screen, that’s the easiest part to tackle first. Open the screen about halfway, lift it straight up so the bottom rollers clear the track, then angle the bottom out toward you. Carefully set the screen aside — you might be able to reuse it later.
Step 3: Take Off the Sliding Panel
Now for the main event: the movable panel.
-
Find the adjustment screws on the bottom edge — usually there’s one near each end.
-
Using your screwdriver, turn these counterclockwise to lift the rollers inside the door. This lowers the panel slightly, giving you more clearance to lift it out.
-
Slide the door about a third open so you can grab both sides.
-
Lift it straight up so the bottom edge clears the track, then tilt the bottom toward you and gently pull it out.
If it won’t budge, check for extra stops or clips along the top track that might be in the way.
Step 4: Remove the Fixed Panel
The stationary panel is usually held in place by a side jamb or a metal/wood stop. Look for screws or brackets along the edge of the fixed panel.
-
Use your drill or screwdriver to remove these stops.
-
If there’s paint or caulk sealing the panel, score along the edges with your utility knife to break the seal.
-
Use your pry bar gently along the edge to loosen the panel — work slowly to avoid cracking the glass.
-
Once loose, lift the panel up just like the sliding section and tilt it out carefully.
Pro tip: Have your helper hold the panel steady while you pry so it doesn’t shift unexpectedly.
Step 5: Detach the Frame
With the glass panels out, you’re halfway there. Now it’s time to remove the frame.
-
Locate and remove any screws anchoring the frame to the door jamb or sill. These might be hidden behind trim pieces or caulk.
-
Run your utility knife around the entire frame where it meets the wall — this cuts through paint and caulk that could make removal harder.
-
Starting at one corner, use your pry bar to gently work the frame loose. Go slowly and evenly to avoid damaging the surrounding drywall or siding.
-
Once the frame is free, pull it out in sections if needed.
Step 6: Clean Up and Inspect
With the door and frame gone, you’re left with a rough opening — probably a bit dusty and maybe hiding a few stray screws or nails. Remove any remaining fasteners, sweep up the debris, and inspect the opening for rot, mold, or damage. Fix anything that needs attention before you install your new door or wall it up.
Common Mistakes to Avoid
Learning how to remove sliding glass door panels is pretty straightforward — but even seasoned DIYers make mistakes. Here are a few you should steer clear of:
Forcing Stuck Panels
If something won’t budge, don’t muscle it. Check for hidden screws, brackets, or caulking you missed. Forcing it can shatter the glass or warp the frame, making your day a lot worse.
Ignoring Safety Gear
Gloves and goggles aren’t optional when you’re handling large panes of glass. Even a tiny chip can send shards flying — protect yourself.
What To Do With The Old Door
So now you’ve got an old door leaning against your house — what’s next?
Recycle or Reuse
Check with your local recycling center — many accept glass and aluminum frames. If you’re crafty, you might even repurpose the glass as a greenhouse panel or DIY project.
Donate If Possible
If the door’s still in decent condition, consider donating it to a local Habitat for Humanity ReStore or salvage yard. One person’s old slider might be another’s perfect project find.
When To Call A Pro
Most people can tackle removing a sliding glass door on their own, but if your door is huge, super old, or tied into a structural wall, don’t risk it. A licensed contractor can remove it safely without messing up your home’s structure or weatherproofing.
Conclusion
And that’s it — the full roadmap for how to remove sliding glass door panels and frames like a pro. It’s not rocket science, but it does take a bit of muscle, patience, and care. Whether you’re prepping for a stylish new door, sealing off an old patio entrance, or opening up your home to a new design, taking out that old slider is the first step. So grab your gloves, call a buddy, and go make it happen — you’ve got this!
FAQs About Removing Sliding Glass Doors
1. How long does it usually take to remove a sliding glass door?
Most DIYers can remove an average-sized sliding glass door in about 2 to 4 hours, depending on the condition and complexity.
2. Is it safe to remove a sliding glass door myself?
Yes, but only if you follow proper safety steps. Always wear protective gear, handle glass carefully, and have a helper for large panels.
3. What should I do with the old door?
If it’s in decent shape, donate or sell it. If not, recycle the glass and metal parts responsibly.
4. How much does it cost to hire a professional to remove it?
Expect to pay anywhere from $150 to $500 depending on the size of the door and the complexity of the job.
5. Can I install the new door myself too?
Many homeowners do! Just make sure you have help and follow the manufacturer’s instructions carefully — proper installation is key for energy efficiency and security.